
|
I had the opportunity contribute to two articles for a special issue of Quaternary International entitled "Not Only Use" that was edited by Juan Luis Fernández-Marchena, Lena Asryan, Antonella Pedergnana, and Andreu Ollé. The issue contains an impressive overview various methodologies used to study wear the burgeoning interest in multidisciplinary efforts to study wear traces (i.e., traceology) of different origins and the processes (i.e., operative chains) involved in manufacture, use, and abandonment of an object that is later recovered by an archaeologist (check out the editorial by Fernández-Marchena et al. for more info). The first article was lead by Raquel Hernando. In short, Hernando was interested in understanding if recent advances in optical microscopy could resurrect its use for the study of human dental microwear. Hernando noted that dental microwear analyses originally used optical microscopy, but it was later replaced by scanning electron microscopy (SEM). Eventually confocal microscopy became the favored technology for occlusal dental microwear analysis (i.e., dental microwear texture analysis, or "DMTA"), while SEM is still preferred for buccal microwear analysis. However, Hernando and colleagues note that SEM analyses are costly (we generally pay by the hour to use these microscopes) and the postprocessing of images is also quite time consuming (and exhausting for your eyes!). DMTA is generally quicker, but the microscopes—and software needed for DMTA—is not nearly as widely accessible as SEM. That means costly travel, lodging, and user fees to do DMTA analyses for many of us without local access to equipment. So, why not revisit optical microscopy? Hernando and colleagues point to many advances in optical microscopy that have been explored in the context of traceology. Buccal microwear seemed like the best place to start since it still widely uses SEM. Hernando and colleagues found that OM produces very similar results to traditional SEM methods whether one studies the original tooth or a dental cast of a tooth (see image below). 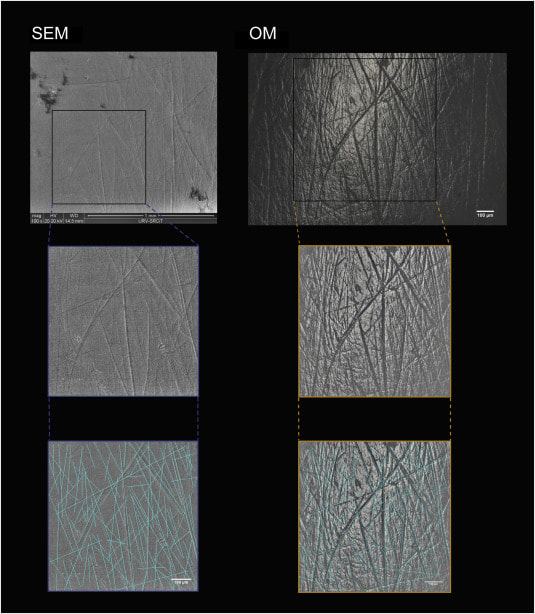 Above: Comparison of scanning electron (SEM) and optical microscopy (OM) images of buccal microwear. Note the excellent resolution in OM. Raquel Hernando and colleagues noted that optical microscopy provides many other advantages over traditional SEM analysis: less expensive equipment with less associated maintenance, wider accessibility of optical microscopes for researchers, less eye fatigue, greater image resolution, 3D appearance of images with greater definition, and relatively quick data acquisition and analysis. A drawback is the need to build up open-access databases for comparitive purposes, but the data produced in this paper marks the beginning of that effort. This study points out the importance of revisiting methodologies with a critical eye, but also how interdisciplinary research—something IPHES takes great pride in—can lead to innovation in allied fields of research. The second article explored the use of gigapixel-like (GPL) images for studying external surfaces of teeth. GPL images make use focus-stacking (extended focus images) and panoramic stitching of microscopic images to create mosaic images with high depth of field using SEM. This “gigapixel-like” (GPL) imaging strategy can be used to create multiscale, high-resolution images of entire, or partial, dental surfaces that can be viewed from a field of view that encompasses an entire tooth surface to high magnification views of dental microstructure, microwear, taphonomic features, among other features. The images have a variety of uses from the communication of results in scientific publications to their use in interactice museum displays and websites or training researchers. 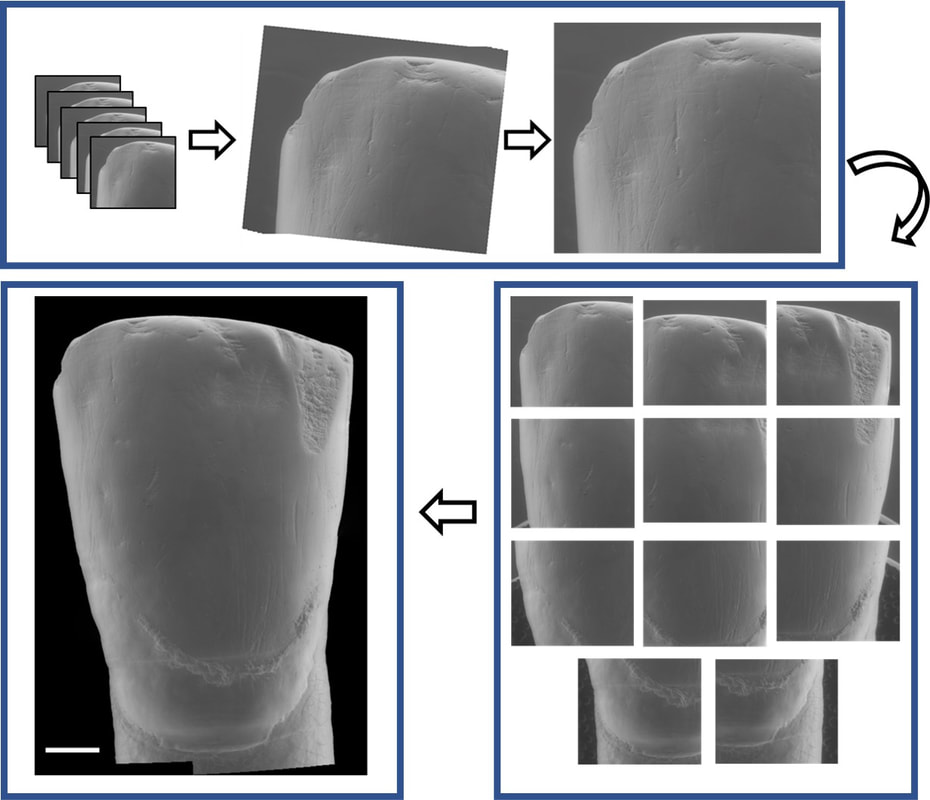 Above: simplified outline of focus-stacking and creation of image mosaic to create a gigapixel-like (GPL) image. 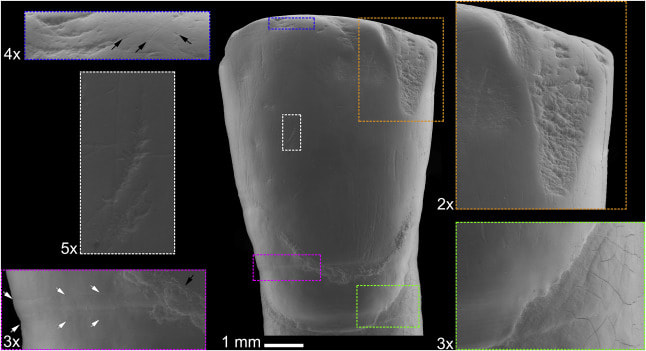 Above: A GPL image (center) with call-out boxes of varying magnification that indicate different surface features. Descriptions proceed clockwise from upper right corner. Orange rectangle: Medium size antemortem enamel chip with well-worn margins. Green rectangle: Detail of cementoenamel junction and root surface. Subtle perikymata (bottom left quadrant) and striations (upper left quadrant) are visible on the enamel. Subtle postmortem cracking of root surface also evident. Magenta rectangle: Detail of furrow-form hypoplasia with clearly visible perikymata (between white arrows). Black arrow points to dental calculus deposit. White rectangle: Detail of instrumental striation with a right oblique orientation. Blue rectangle: arrows indicate microstriations on labioincisal edge and a well-worn, but small, antemortem enamel chip to the left of the image. While the goal of the publication was to outline the GPL methodology and uses, we also made an interesting discovery from the creation of a GPL image for one of the teeth from the Chalcolithic context (dated to about 4000 years before present) of El Mirador Cave near Burgos, Spain. We found that at least one tooth exhibited a strange discoloration when viewed with the naked eye (see photo below). Microscopic examination revealed that the discoloration is related to enamel erosion—something that is rarely documented in prehistoric contexts. 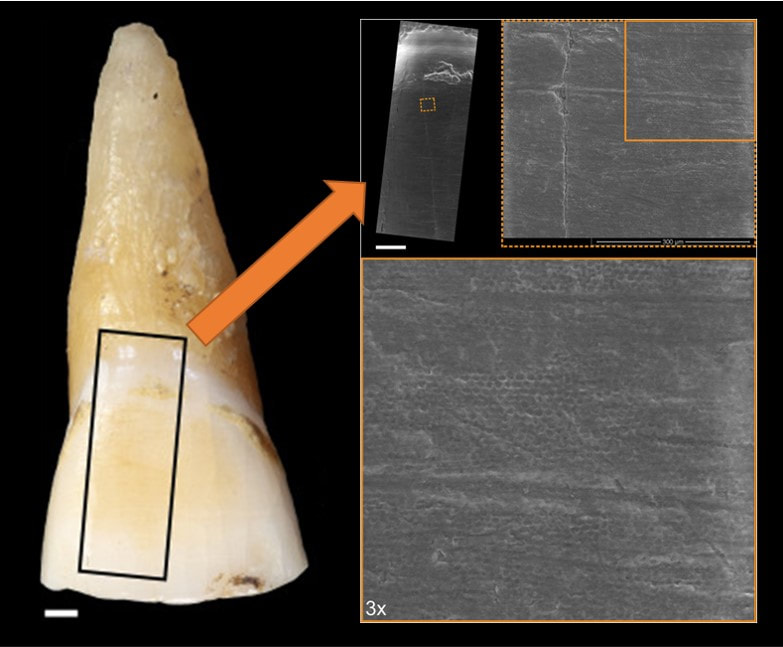 Above: Photo of original tooth with discolored (yellowish) enamel surface. GPL image sampling indicated by black box and GPL image indicated by orange arrow. Zooming in on section 300x shows "honey-comb" appearance of enamel surface. This indicates erosion of the enamel. This study makes me suspect that erosion in teeth from archaeological contexts is much higher than we currently acknowledge, and calls for a need for detailed analyses of the original teeth in conjunction with high magnification analysis for definitive diagnosis. Nonetheless, this is a very interesting (and rather accidental) discovery. More analyses of the El Mirador material are underway. References and further reading These studies:
Additional references:
0 Comments
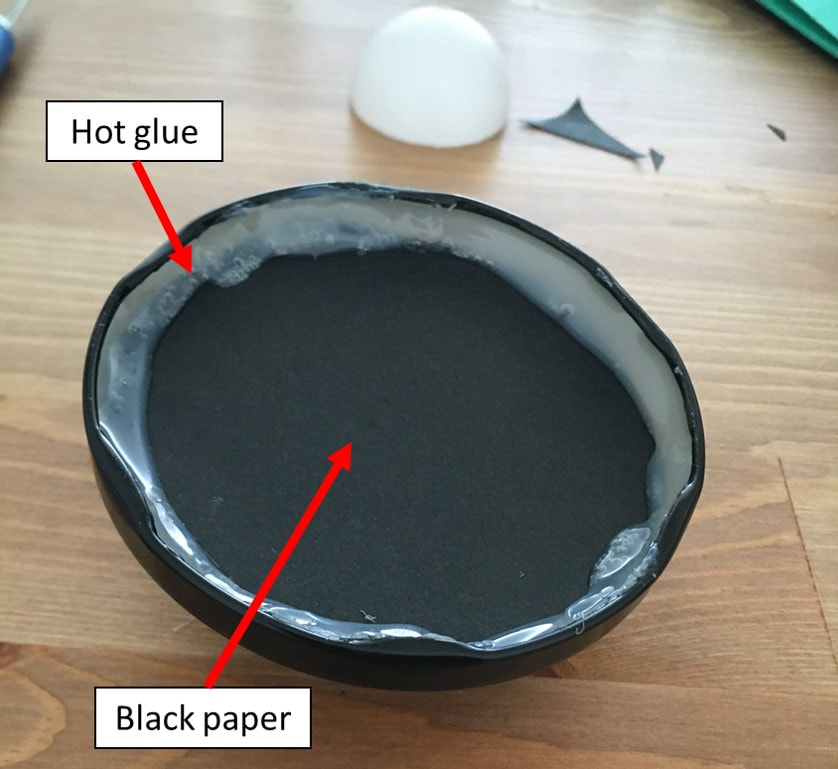
I use a lot of photography and microscopy to document minute surface details on the fossil and bioarchaeological human remains I study. A problem I constantly deal with is getting the surface I want to visualize in the appropriate orientation—especially if the object is small and fragile (e.g., teeth). Some researchers use small sandboxes, and this is effective, but it presents a few problems. Abrasion from sand is probably the biggest concern, since it can cause taphonomic wear--a real problem for those of us interested in using dental wear for dietary and behavioral reconstructions. Black aquarium sand is often preferred, but it is not only abrasive, but so fine that it is often difficult to remove from the surfaces of the object you place in it when you are finished photographing them. Lots of researchers like to use modeling clay, but clay is also extremely difficult to remove from surfaces. Even if a surface looks clean, you are bound to see some clay residue under high magnification. Some researchers also have a tendency to push the object they are studying into the clay which can damage fragile artifacts or wedge clay into tiny crevasses and cracks. The more time you send adjusting the object for imaging introduces more opportunities to damage, abrade, or dirty the artifact you are trying to document. A good solution for small objects is to use a tilting stage that allows you to orient the object without touching it over and over again. I have wanted a microscope tilting stage for quite some time, but they are generally not cheap when you do come across one. I did a bit of searching and came across a DIY stage with step-by-step instructions online, and decided to try my luck at making something similar with objects I have in my apartment and a couple of small purchases. The tools I used (hot glue gun and hobby knife) are easy to come by, and the supplies I purchased (a washer, small screw nuts, black paper, and ping pong balls) are super cheap and easy to acquire. I spent about 2 euros and found the rest of the supplies sitting around my apartment. 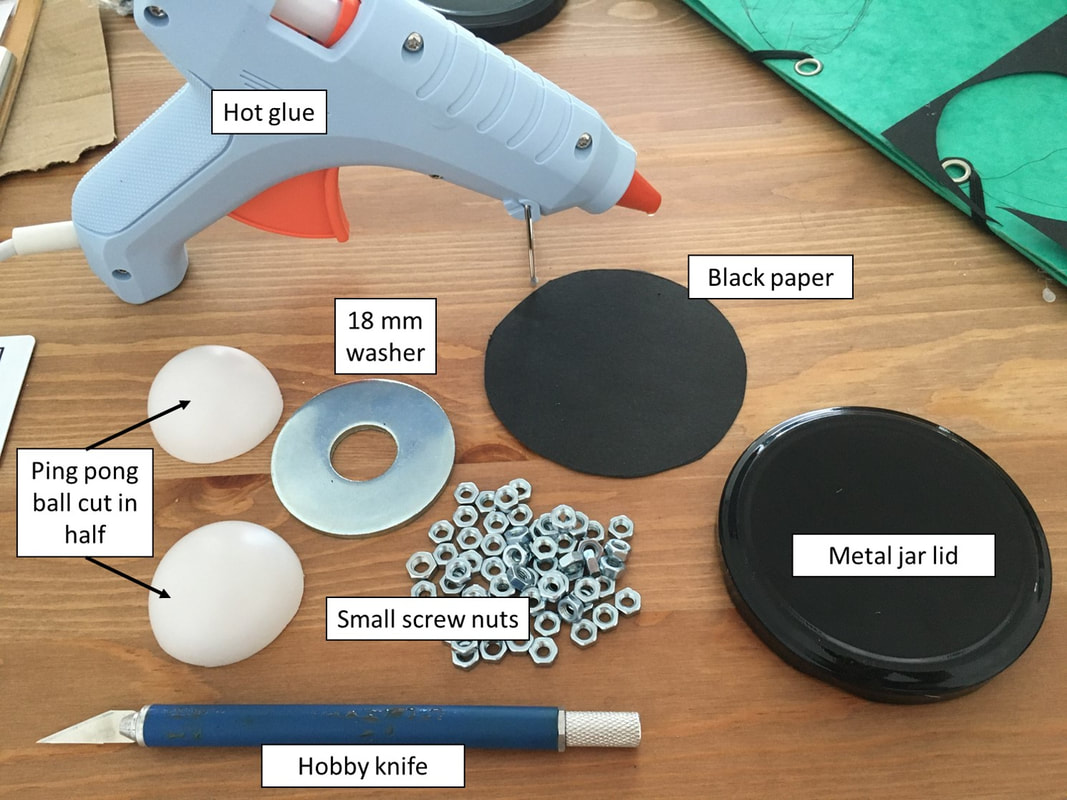 You can probably substitute a number of other household objects and still make a similar tilting stage. The ideal "nuts" would be lead shot, fishing line weights, etc. You could probably use a racquetball in place of the ping pong ball like my colleagues do at IPHES, but you may need to swap out the washer base for something larger (e.g., a section of pvc tubing, thick-walled poster tube, etc.). I have been playing around with the idea of using a magnetic ball mount kit intended for cell phones, but this DIY project was easier and quicker than ordering stuff online. 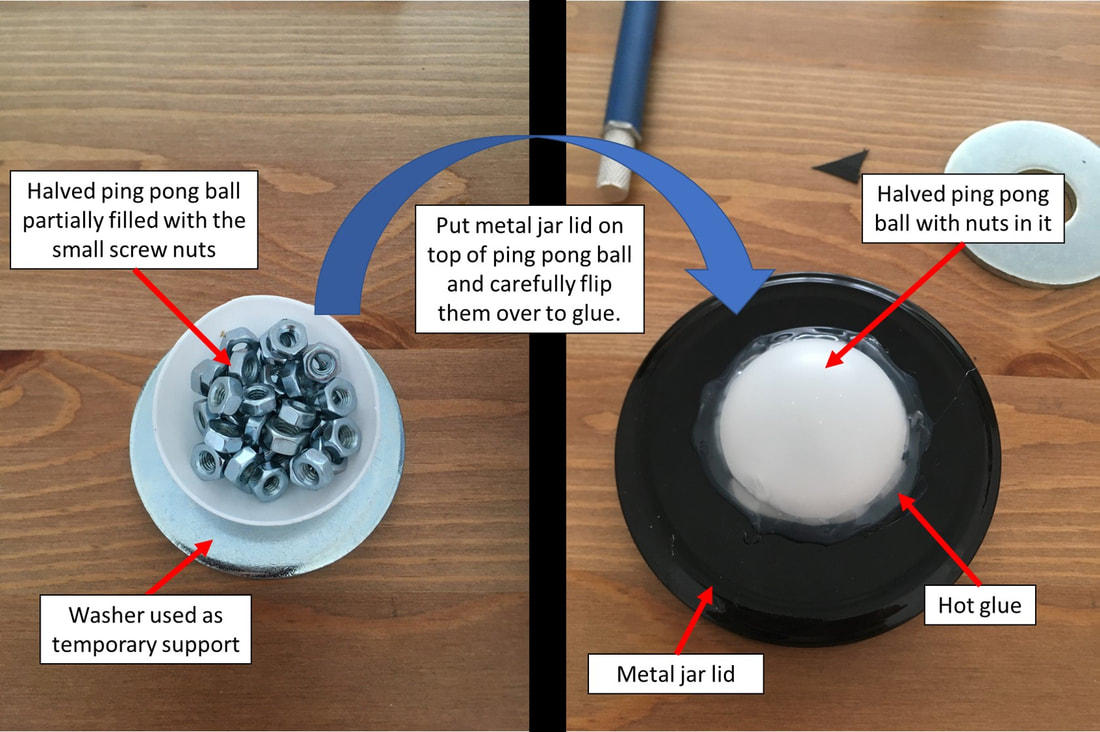 Play around with the ping pong ball a little and adjust the number of nuts used as counter weight if needed. My glue gun runs hot but still didn't melt the ping pong ball. Be careful when gluing the ball to the lid because the lid will get hot! I pressed down lightly on the ping pong ball to ensure a good seal as the glue dried.
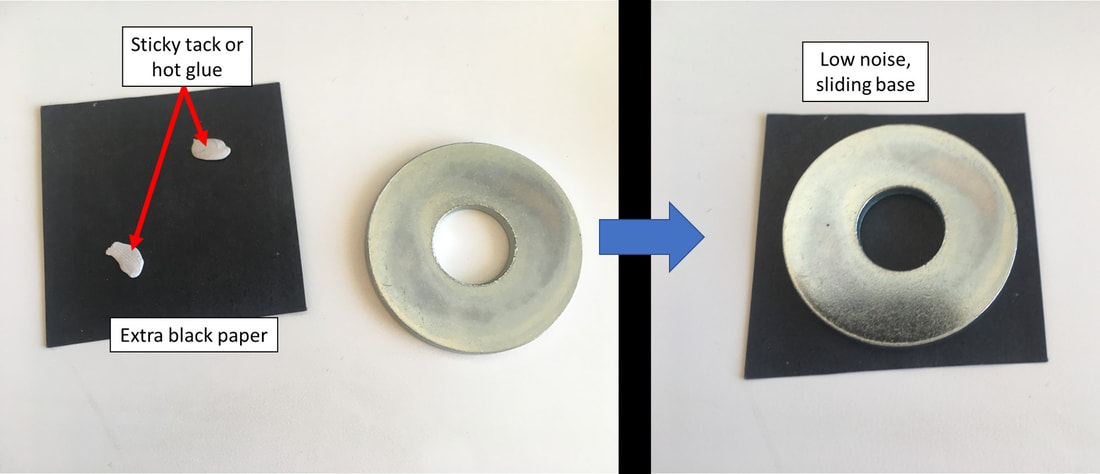 The washer made a lot of noise when I place the finished tilting stage on my portable microscope stand. I decided to stick a piece of paper on the bottom to prevent it from scratching the stand base and reduce the noise. I generally use a piece of black paper under whatever I am viewing to help slide the object around under the microscope (it's a lot easier than using the x-y adjustment stage I have when working at low magnification anyway). The tilting stage slides around effortlessly on my microscope stand with the added paper. 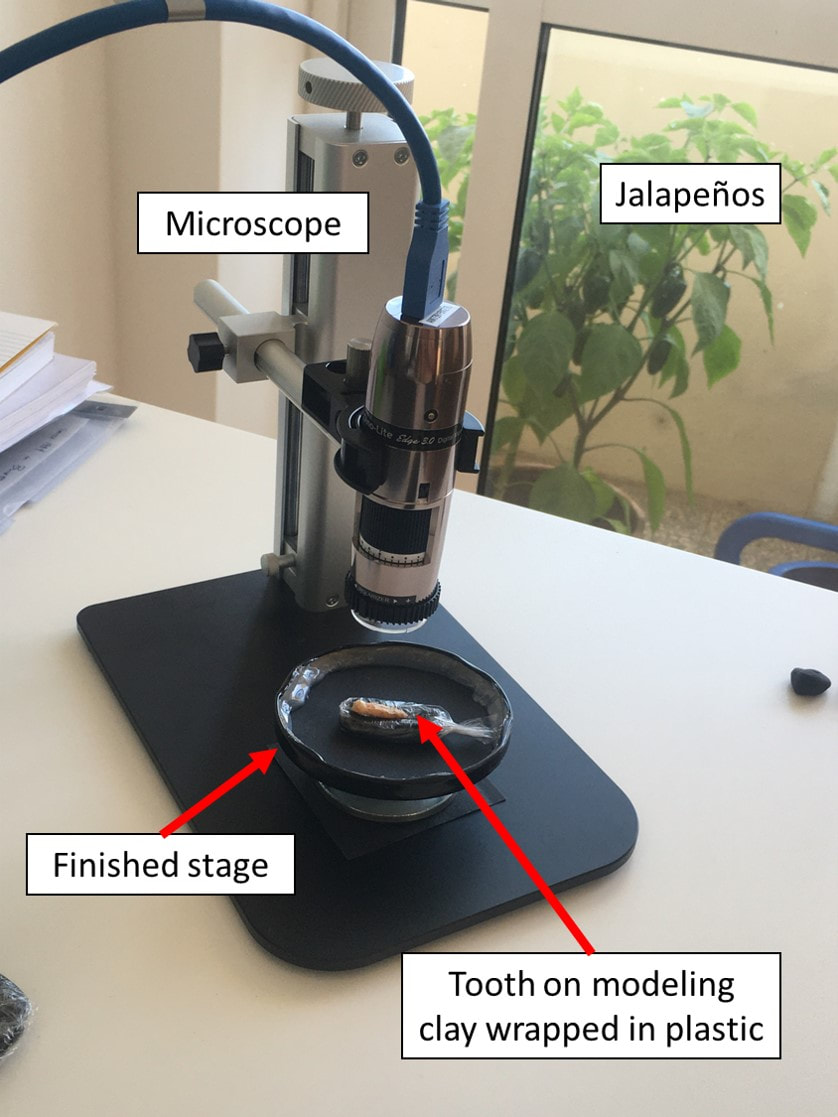 The entire process took less than 10 minutes and 2 euros to complete. Plus, I still have 4.5 ping pong balls left... I'll probably modify this stage or build different stages as I come across better supplies in the future. I will make a new post if I make any significant updates. For now, this is a very efficient tool for imaging loose teeth with a portable microscope and digital macrophotography, and I am very happy with the result.
|
John C. Willman
A place to find updates about my research. Archives
July 2021
Categories
All
|
 RSS Feed
